Welcome to the world of classic car restoration, where patience meets passion! Today, we’re focusing on the iconic Scout II, an off-road vehicle produced by International Harvester from 1971 to 1980. Known for its rugged design and versatility, the Scout II makes a fantastic project for enthusiasts looking to bring a piece of automotive history back to life. Here’s a detailed guide to restoring a Scout II, from initial assessment to the finishing touches. This is most likely the process for restoring all types of cars and trucks. It can’t be that different.
Step 1: Initial Assessment

Assess the Condition: Start by thoroughly assessing the current state of your Scout II. Check for rust, especially in moisture-prone areas like the floor pans, frame, and wheel wells. Assess the condition of the engine, transmission, and electrical systems.
1) In January of 2024, I started assessing the condition of several Scout II SUVs – (Black 1 ’76) (Black 2 ’72) (Yellow ’76) (Red ’79)
2) I ended up purchasing the ’72 Model Scout II with “minimal” rust. I want to add front disc brakes, power steering, and a few other upgrades.
3) I estimated I would need to spend about $35-40K to get this thing up to snuff. I may want to do an LS swap, but I’m unsure if it is in the budget….
Create a Budget: Based on your assessment, outline a budget. Restoration can be costly, and unexpected expenses often arise, so include a contingency fund.
1) I have a budget in mind for this project, but I don’t know how far off I am. I want to stay under what it would cost for a brand-new Bronco Badlands ’24.
Timeline: Set a realistic timeline. Depending on the extent of the work needed and your availability, restoration projects can take anywhere from a few months to several years.
1) I plan on having this project completed around the time that my firstborn graduates high school. That gives me a little shutter as I type it. So, my timeframe is about 24 months. I will need to keep my foot on the brakes because I am one of those guys who sees it and goes!!

Step 2: Planning and “Guy” selection.
I assume you are not doing this all yourself. That means you are going to need “A Guy” to do the work for you.
Engine Guy: Depending on your engine setup/transmission/exhaust etc. Most “old school” mechanics can do it all, but they may have specialties or areas where they excel. You should interview your mechanic and build a level of understanding of what they can handle. Determine the budget and negotiate the terms of the dwork. Estimate total hours and determine how much hourly or project work will cost you.
~ Engine Work, fuel sender, plumbing for fuel
~ Exhaust work – headers, exhaust, EFI system
~ Electrical – adding A/C plumbing equipment, all over wiring, including lights
Select a bodywork/paint guy: I will also assume you want to paint your Scout II and will have rust removal and some type of body panel work. I created numerous paint renditions and utilized AI to refine my final look. You may already know what you would like to do and don’t need help.
~ Rust Remediation, panel replacement/straightening, welding.
~ Rhino lining, sound deadener, priming, sand blasting, etc.
~ Final paint and clear coat.
Again, this will be a theme. Negotiate on the front end. Get an estimate of the scope of work and the estimated time to complete. Keep checking in on the progress.
Upholstery Guy: This was a roll of the dice for me, but I found a guy and gave him a small project. He did well, so I continued to hand off work.
~ Dashboard, seat covers, arm rests.
~ Headliner
I found one guy who was responsive and did a pretty good job. Start slow and check budgets and time per job.

Step 3: Body Work

Rust Removal and Repair: Treat rust or replace rusted sections with new panels. This might involve cutting out bad sections and welding in new metal. I had to take out both sides of the floor pans and repair the back window.
Body Preparation: Sand the body to bare metal, prime, and prepare for painting. This step is crucial for a high-quality finish. I did sandblast my Sout II, which got rid of all the paint and exposed all the places that needed to be replaced.
Painting: Choose a color true to the Scout II’s era or something unique. I decided to do something a little different, which will give a nod to the past but make it my own. Apply 2-3 base coats of primer, followed by 2-3 coats of color, and finish with a 2-3 clear coat for protection.
Step 4: Mechanical Overhaul
Engine Rebuild: If the engine is removed, it is time to rebuild or refurbish it. Replace worn-out parts like seals, gaskets, and belts. I don’t think I am going to replace the engine since it was already swapped with a small block 350. I will, however, update the belt drive system.
Suspension and Brakes: Renew the suspension system and brakes. This may involve replacing or refurbishing springs, shocks, and brake components. I did replace the rear axle with a Yukon Dana 44.
Electrical Systems: Modernize the wiring harness and replace outdated or non-functioning components.

Step 5: Reassembly and Restoration of Interiors

Reassemble the Body: With the painting done, my body work guys began reassembling the body parts, including doors, hood, and trim pieces. They removed all the parts except the rear quarter panels and primed them inside and out.
Interior Restoration: Reupholster the seats and replace the carpeting. You can keep the original color scheme or update it to something contemporary.
Install Electrical Components: Fit in the refurbished or new dashboard, instruments, and other electronics.
Step 6: Final Touches
Quality Checks: Before the final touches, ensure everything is working correctly. Check all mechanical and electrical systems. For me, this was the part that tested my patience the most! You are almost there, and there is always something that takes longer than expected.
Detailing: Thoroughly clean and detail your Scout II, focusing on aesthetics and functionality. I will have it detailed and the engined steamed and cleaned.
Road Testing: Take your restored Scout II for a test drive. This will help you identify any necessary adjustments to the suspension, engine tuning, or other systems.
Conclusion
Restoring a Scout II can be a rewarding experience, offering a trip down memory lane and a hands-on connection to automotive history. Whether you plan to show off your restored beauty at car shows or enjoy off-road adventures, the time and effort put into restoring a Scout II will bring immense satisfaction and a significant return on investment if you ever decide to sell.
Remember, the key to a successful restoration is patience, meticulous attention to detail, and a deep passion for classic cars. Happy restoring!

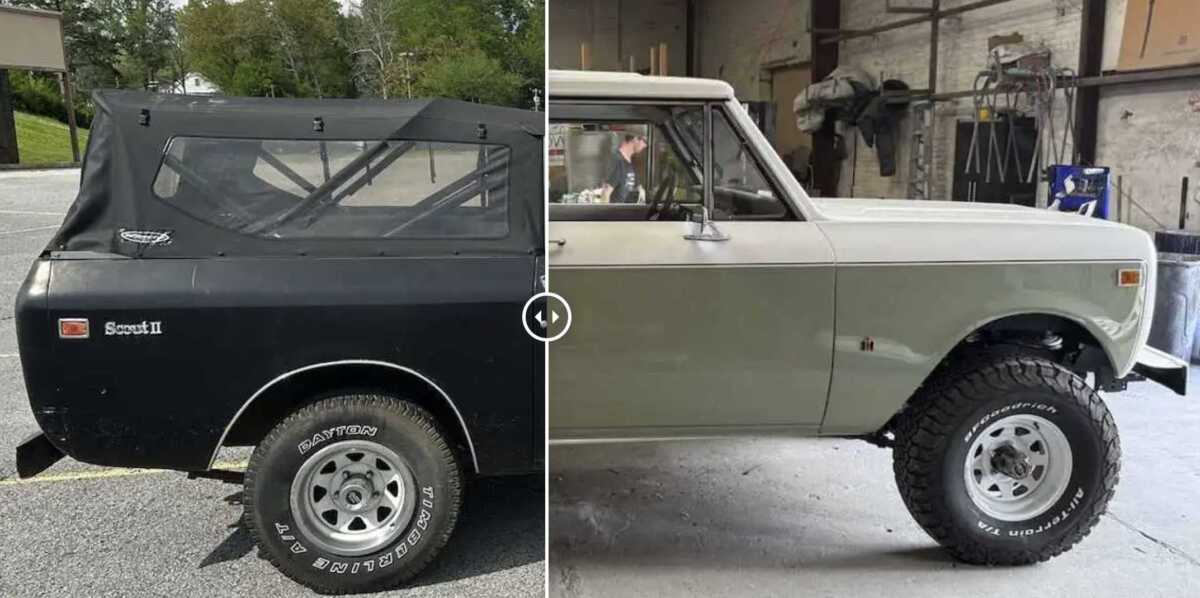
Start:
Finish: